
Homemade doughnuts for the win fat
For the last few years I’ve tested a theory that the difference between carefully-prepared bread dough — following instructions to the letter, mixing in the right order, etc. — and just throwing the ingredients in a breadmaker and letting God sort it out is, at most, 10% quality-wise. I know the few remaining “foodies” (ack) who haven’t converted over to NEXT NEW THING in the last decade or so are going to hold their fingers in the sign of a cross and back away, but too bad, it has worked perfectly for everything from pizza dough (not really a stretch [sorry, there will be puns]) to rolls, to naan, to a bunch of raised breads with fiddly instructions involving scalding milk*, keeping dry and wet ingredients separate**, and several other steps that probably help a little but don’t get dinner on the table before bedtime.
I’m too lazy for a lot of that crap anyway.
Today’s experiment was to take a doughnut recipe from Alton Brown — which, mind you, because I am loathe to spend the dough [told you] on frying oil and stink up the house with it, plus commit to another couple frying sessions during the week to justify it, I’ve had for at least a decade but haven’t made — and throw it into the bread machine and see what happens.
What’s that you say? “Even using the bread machine you’d still have to fry them?” Nope! We’re baking these bad boys.
Here’s the procedure:
- Don’t change ingredients at all. With most bread machines I’d cut the recipe in half or you’ll have The Dough that Ate [Wisconsin/Minnesota/wherever]. The good news is, unlike most online recipes, Alton’s usually are correct as far as the “makes eleventy-billion” count, so you should still come out with about a dozen doughnuts.
- I did, in fact, warm the milk — in the microwave! (Remember: lazy…) — so I could melt the shortening.
- Put the ingredients into the pan in the order you’d usually use for a bread machine. For the uninitiated:
- Liquids at the bottom.
- Sugar and salt into the liquid (this isn’t necessarily standard, but it works).
- Flour and other dry ingredients.
- Make a well in the top of the flour and put the yeast in it.
- This is also not strictly necessary if the liquids aren’t too hot for the yeast, but it keeps the yeast out of the salt for a bit which might help it get started. And it’s something the first bread machine recipes always said, so it’s kind of ingrained [ugh] now.
- Note that I did not bloom the yeast; we use instant. And even with packets of regular yeast, I might not have bloomed it.
- The dough is very wet, but roll and cut as instructed, although I used bigger cutters than he suggested.
- Sprinkle a little flour on the cookie sheets you will bake them on, then set them on and let rise for 30 minutes (sorry, didn’t try it without that one, although it may be ok to skip if you want them a bit denser).
- When it’s time, preheat the oven to 375°F with convection, probably 400°F without.***
- Gotta watch these to figure out when they’re done- turns out having 2 pans of these in the oven is a pretty good way to map out hot and cold spots in there, even with convection.
The results? The full recipe tried to climb out of the breadmaker a couple of times, so I ended up punching it down twice during the process. But…

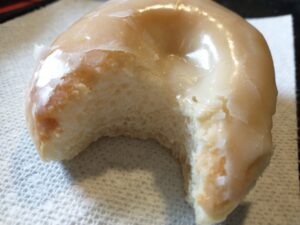
They are the lightest doughnuts I’ve ever had.
That’s not necessarily ideal — I like a little chew in them, which we might be giving up by using the bread machine — but yowza, with a little bit of glaze**** on them they’re great.
The taste of the dough is pretty darn good, but I might tweak things a little. I was worried the nutmeg would overpower, but it was nicely in the background where it should be.
All that to say: this is my new default doughnut recipe (I usually make cake doughnuts or doughnut muffins, which bake easily). Next time I might mix a 1/4 portion of bread flour in there to try to give them a little more tooth, but this is the base recipe for the next 5-10 lbs I add back to myself this winter.
Highly recommend if you don’t care about the health effects (or have saved up a cheat day).
[Jul 2025 UPDATE: Air fryers work nicely as long as you don’t mind doing it in batches. This is extremely dangerous knowledge (for your blood sugar, at least).]
—-
*I’m aware that this actually has a chemical purpose in some recipes. Others, not so much.
** I know, that’s actually necessary for certain recipes like biscuits and quick breads. You have to know when to apply the laziness magic.
*** I also tried a cast-iron pan to which I added water when the doughnuts went into the oven, to attempt to produce some oven spring. I don’t think this is necessary. Side note, this was done with a gas oven in case that makes a difference; there was already some water vapor being made IIRC.
**** Almost forgot to mention, I added a tbsp of melted butter to the glaze recipe. Amazingly I didn’t have to scale up the powdered sugar after that.
Recent Comments